Sunday, 12 May 2013

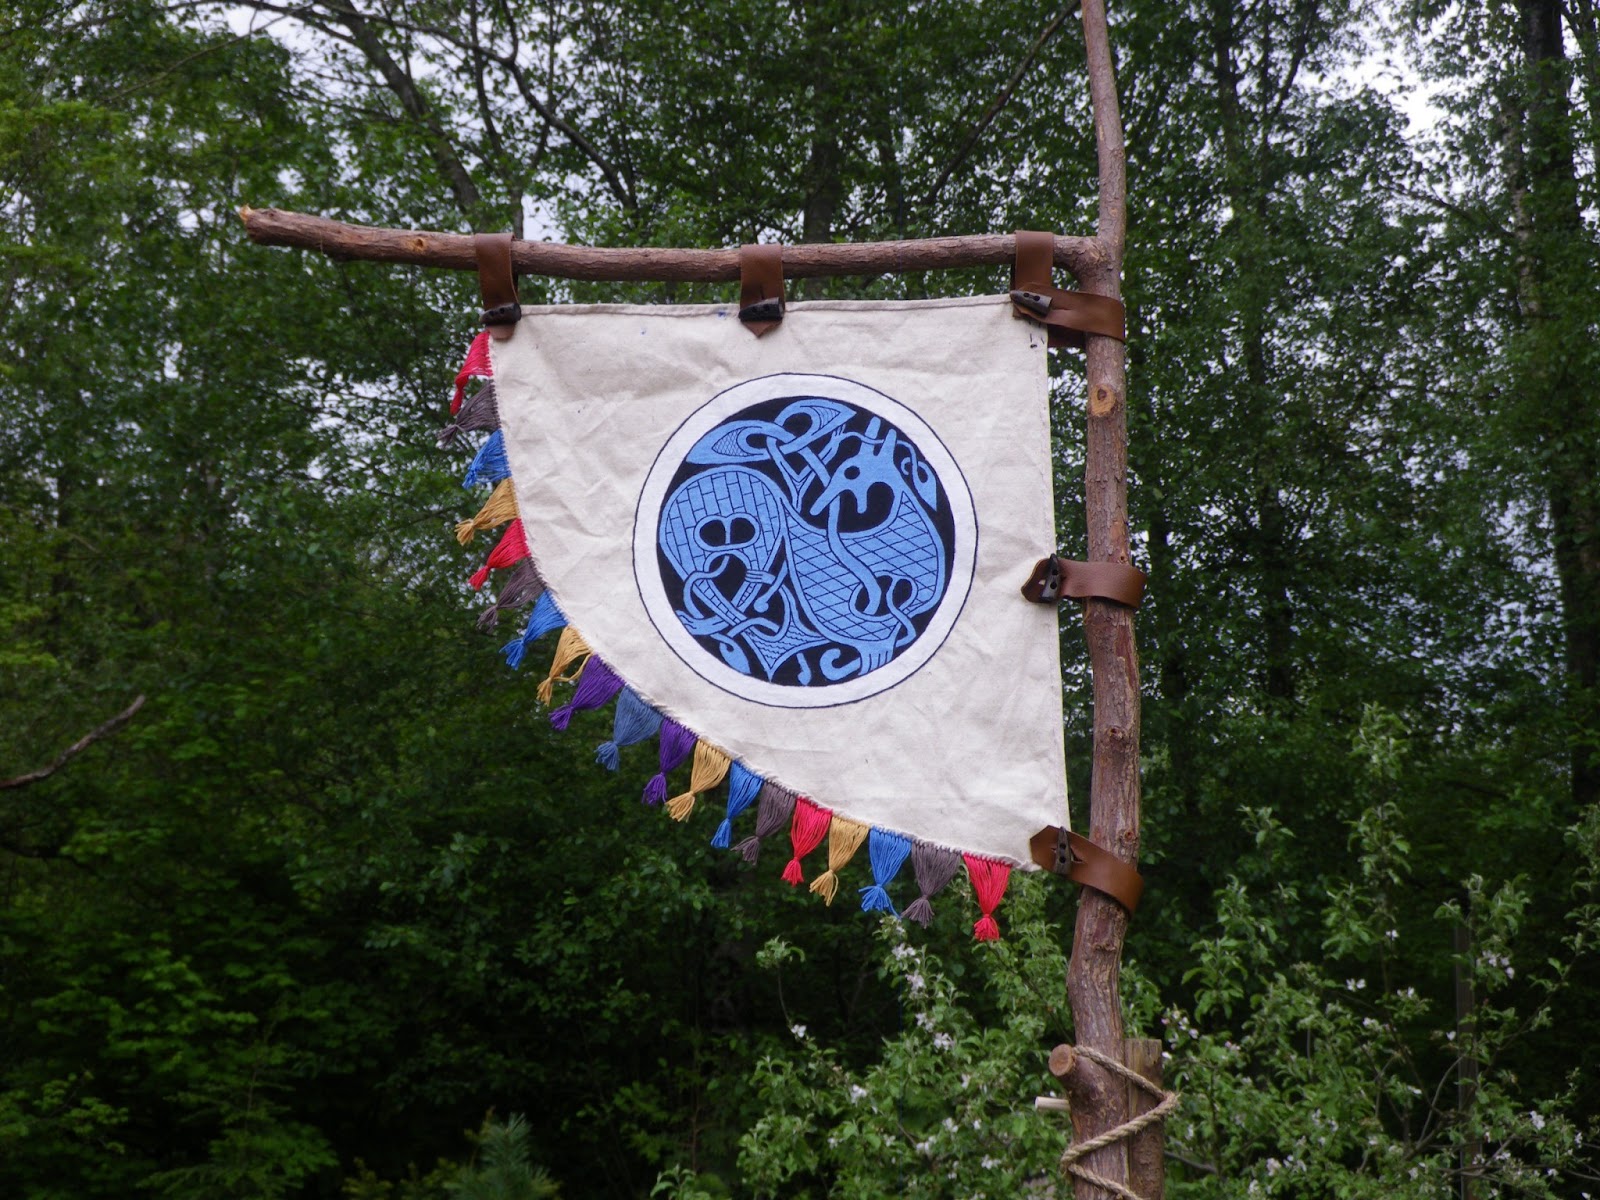
Viking Banner and my personal emblem


Finished with tassle fringe.
This project started with the support stick. I harvested it from my yard when clearing some trees and branches. It has a perfect side branch growing at a right angle from the trunk. I knew I had to use it for just such a purpose as a viking banner, inspired by the wind vanes from some of the viking ships. But I hadn't come up with a design to go on it. Until now...

The design is my own, inspired by the Oseberg Art style.

The canvas was some leftover scrap from my tent, I added some leather straps and horn toggles and painted the design on both sides. It is all hand-sewn.


To add more colour, I hand-knotted the tassle fringes which you can see in the first picture.

To give it height, I fashioned a straight stick that I can drive into the ground and, to which, I can attach the banner. The dowel pegs help to align and strengthen the joint while the rope holds it all together.


You can see the season change in the foliage in the background, indicating it took awhile to get done - mainly deciding to add the fringe. I'm happy with how it turned out and can use it for my banner for my campsite at demos and also as my unofficial 'Coat of Arms' at SCA events. I'm not a member of the SCA but was awarded their Award of Arms (meaning I'm officially a Lord in their game).

Thursday, 28 March 2013

My Blue and Leather Shield

My latest shield creation is so I can have a tougher shield for shield wall demos. So this one is made of plywood like all the other recreationists in our group use. In summary, I glued a burlap facing on it and painted it blue (my colour). Then I added carved leather ornamentation. The boss is made from an iron bowl that I modified.

Here are the pictures of the steps;

I started with the boss - an iron bowl that I cut and trimmed so it would be about 6" diameter with tabs for rivetting. I used steel wool and lots of elbow grease to remove the rust and polish it a bit. Then coated it with vegetable shortening and heated it all over with a propane torch to season the metal so it wouldn't rust so bad.

The blank (which already had a handle attached), laid horizontally on a table, was coated on the facing side with white glue. Then the burlap stretched over it and smoothed and tacked to hold in place. More white glue, watered down so it would soak in better, was brushed on an the whole face saturated with the water/glue mix. Then it was left to dry.
Burlap added to shield blank. Two more shield blanks behind it.
 

 Next were the leather ornamentation and boss surround pieces. I cut them out of thick leather (the same stuff I use for the soles of my turnshoes).

Basic shape cut out

The design is the same one I used for one of my tent frames. It is my original artwork inspired by extant remains of dragon head tent frames and I wanted to reuse it, especially since the tent frame will likely be used for some furniture items I'm thinking of making. I have two tent frames - I only need one.
Details carved but unstained/unfinished

I made four of these and six of the shield surrounds. Then laid them out along with the boss and trimmed to fit. 
All pieces laid out, trimmed to fit

Next, the facing is painted with a solid blue (Wedgewood Blue) waterproofing stain. Once the first coat was on I added a second, watered down coat as some parts of the wood was not receiving the stain. After all is said and done there are still bits of unstained wood but it is not so noticeable and would be authentic anyway, I think. Note to self: don't use burlap again.


The blue added. Note the outline of the centre boss.

While waiting for the shield to dry it was time to stain and polish the leather pieces.
Stained and polished


I added some leather edging along the inside hole where the boss will go and leather wrapped the handle. The boss and surrounds were rivetted in place (not true rivets but square rosehead nails from Lee Valley) and the dragon head ornaments glued and tacked into place. The last bit to go on was a strip of leather around the rim, stained oxblood red. I'm pleased with the results.

Finished

Wednesday, 25 July 2012

Mini Oseberg Loom

Just recently, amid the projects I NEEDED  to work on, I had inspiration to make an Oseberg style loom - but smaller. As a prototype. Below is what I ultimately want to make;

The original drawing of the reconstruction. Gleaned from the 'net
The loom was used for tablet or card weaving and was found in the Oseberg Viking Ship burial. My prototype is a table or bench top version. I had all the materials I needed so here we go. You can see it with all the pieces rough cut and test-fitted.


The base is made of some unkown wood but has a beautiful colour when oiled. The shape is inspired by the original. I decided it did not need feet but that the ends would do the trick.

The uprights are fir. Originally, they were Kubb batons for another kubb set I'm making, but they looked like they would be perfect and sure enough, they were. I had to notch where the horizontal support joins and round and smooth the tops. And I think I achieved a slight taper but I'll have to double check.

The horizontal support bar is oak.

Here it is assembled and oiled. I just used raw linseed oil to bring out the natural wood colours and add a bit of a golden tinge.


The detail below shows the false dowel tenon. I screwed them together and used my secret glue that looks and acts like pitch for gluing in the plugs.


The uprights are secured to the base with actual trenails using small wedges made of horn. And more secret glue.


I was actually going to make it so it could be taken apart but a number of mistakes were made which necessitated permanently assembling it. But it is not that big. Now to get the ladies to try it out...

And since you have read this far, I'm going to tell you what my secret glue is....roofing patch! Looks like pitch tar glue.

Sunday, 15 July 2012

Tyri's Horns


Tyri (that's her norse name but I'm not sure if the spelling is correct), a Reik Felag member who is also a prominent member of the SCA, had these two drinking horns that needed some TLC. The rims coming off was the biggest problem. They were very nice matched horns as you can see from the pix so when she asked if I could do something with them, including adding some ornamentation, (also, she has given me lots of gifts in the past) I couldn't turn it down. There was no rush.

So they sat in my workshop for a few years.

Finally, I got tired of seeing them and was determined to scratch them and a bunch of other long-overdue projects, off my to-do list.

First, give them a light sanding and polish. Clean the glue residue that held the brass rim in place and reglue the brass rims. Give them a polish along the the finial tips. Normally, I would use a metal polish paste to bring out the shine but as the rim was to come into contact with someone's mouth I opted to polish with dried horsetail and it worked beautifully. Was that what the norsemen used to polish with?

So, now with the rims back on and everything shiny it was time to add the ornamentation artwork. Originally, I was going to carve the designs in but that would have taken much more time than I was prepared to give them, especially since I wanted to make a stand for displaying them. Tyri's symbol is the double swan motif she told me so the design I used is reminiscent of such I think you'll agree.


It is inked in, not painted. I was concerned the paint might flake off as I only have water-based paints to use and it would have required oil-based paint (or lots of sanding). Then I clear coated them with food grade varnish (the same stuff used for salad bowls). I didn't use the beeswax polish I normally use as that requires reapplying from time to time.

Next, I made the stand. The base is oak and the upright is a wood that I'm not sure what species it is but it has a peppery smell. Some have said they thought it was oak as well but I'm rather dubious about that. The grain isn't right for oak and it carves very nicely - unlike oak. OK, oak carves well also but just 'feels' different under the knife.

I went with a his and hers theme for the stand and, therefor, you see one side has a man with a beard while the other a woman with the turtle shell brooches and string of beads implied in the design.


To hold the horns onto the stand, leather loops were made with spot studs to accent the piece.

The bottom of the stand is covered with fabric and I made little feet out of leather. You don't see these details but they will help to keep the stand from scratching furniture.

I brought the whole thing to the midsummer festival to present it to her but she was unable to attend so I had someone make sure she got it.

I hope she likes them.
Sunday, 22 April 2012

Rustic Chair

I am a wood hoarder.
I admit it.
It came in handy with this project as you will see. Read on.

When I built the hytte as a norse meadhall theme, the plan was also to make a high seat, or big chair, with dragon heads carved and all manner of artwork.
Then life took over and I realized I just needed a chair. So I went the opposite, simple and rustic but utilitarian.
It is made of wood that I have collected over the years; the birch logs given to me from Yingivald, an extra IKEA shelf for the seat, some branches pruned from my Yew and cedar trees, and some cool wooden canes I picked up at a bargain store for almost nothing (I planned to make them into a fence of sorts).
I fastened the pieces together, cutting notches in the legs for the seat, and generally trimming where necessary, assembling with screws and nails for strength but finishing off with lashings so it looks like it is all lashed together.

It all took a few hours but you can see the result as it sits in my hytte as a 'Jarl's chair';

With the sheepskins it is quite comfy - I had to replace the backrest arch branch as it had a twist that was uncomfortable but now that is fixed. I might even take it camping.

I still want to make a nice, carved Jarl's chair, but later.

Sunday, 15 April 2012

Raven Shield

This post is long overdue. When making the Purely Decorative Shield (see earlier) I had some of the material leftover for another shield.

This time, I made the shield to be used. I wanted to put a cloth or leather facing on it - decided on some canvas I had kicking around so once the shield planks were glued together, the round shape and the inner round hole cut out, the handle added, I was ready to add the cloth.

First, I mixed some white glue with water to make a medium to soak the cloth and infuse it with glue, then spread glue on the shield face. I wanted it to be ready to go once I did the next step.
Second, spread the cloth on the face of the shield, and with a paintbrush, dabbed and squooshed the water-glue mix into the cloth.
Third, using little brad nails I stretched the cloth across the shield, holding in place with the brads.
Let dry, trim the cloth, remove the brads.
While I was waiting for the cloth to dry I dished a dollar store stainless steel bowl into a boss.
Add the boss, a leather edging and paint the raven design onto the cloth and...well, take a look...


I'm not sure of how long it took to make in total. I really should learn to document the process better with pictures and time to make. I was toying with the idea of adding more decoration like knotwork, runes, etc. But I like it as is, and it serves as a white shield of peace and the two ravens can represent Odin's ravens, Hugin and Munin.

Oak log Splitting - the Saga Continues

Over the winter the plan was to split the remaining oak logs during a cold snap to see how oak logs split when frozen and test the theory that it is easier and thus, the norse would have split the logs in the winter.

We never had a cold snap all winter except for a few below freezing days which were not enough to freeze the entire log. That experiment was abandoned. But there was still a pile of oak to deal with and projects looming...

So Yngivald and I got together, at relatively short notice, with more power at our disposal on April 14th to get the job done. It was an experiment in itself as I didn't know how a 14" electric chainsaw and 14A circular saw would handle it.

First, start with sharp blades - duh!
Second, plan how you want to cut. Much of the oak  was going to be used for kubb sets so we started with the chainsaw to cut some of the oak into short chunks which later can be cut into the blocks.
For the material to be made into planks it is very useful to have the log split lengthwise in nice straight lines. But our experience is that the log doesn't cooperate. It was obvious that the chainsaw we had was not up to the task of ripping the logs lengthwise. Also, it is back-breaking work.

So we tried cutting a line with the circular saw, as deep as it would go in a straight line along the length of the log and down the end. Then drive wedges along the cut lines, starting at the narrow end, or the end opposite any major knots. This was important.

What we ended up with were very nicely split pieces that would need minimal dressing and provide a good starting point for further splitting to get planks.


So, as you can see from the pictures, it wasn't all split authentic to the period but some lessons were learned, none the less (like reading the wood so you can start at the right end).